Congratulations on your new TomTom GO Exclusive/ GO Camper Max/ GO Camper Max 2nd Gen! This article will take you through the steps to set up your new device and get you moving.
You will learn how to set up your Wi-Fi connection to check for software and map updates and get connected to TomTom services. If you have a GO Camper Max or GO Camper Max 2nd Gen you will also see how to show Camper POIs. You can also find your user manual at the bottom.
1
Getting to know your TomTom GO Exclusive/ GO Camper Max/ GO Camper Max 2nd Gen
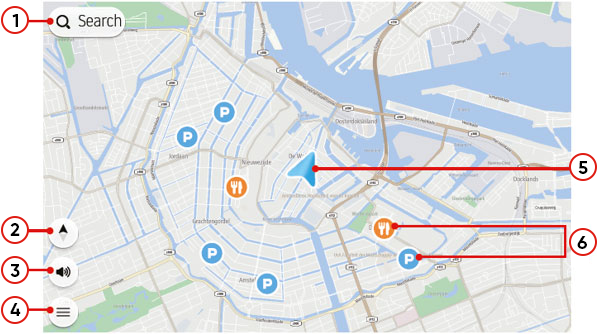
- Search button.
- Switch view button.
- Sounds and Alerts button.
- Main menu button.
- Current location.
- Points of interest and Favourites
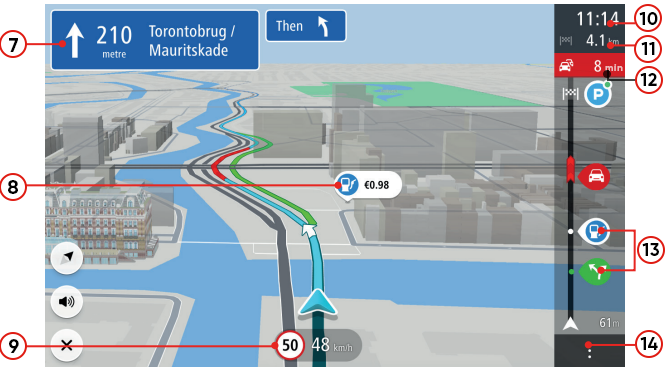
- Instruction panel.
- Fuel station and price
- Speed limit and current speed.
- Estimated time of arrival.
- Distance/time of your destination.
- Traffic delays.
- Route highlights.
- Route option button.
2
Setting up your vehicle details
- Select Settings in the main menu, then select My Vehicle.
- Select Vehicle Type, then select your vehicle type from the list shown.
The My Vehicle screen is shown with settings, for the selected vehicle.
Tap each setting and enter the correct value for your vehicle type. If a setting will not be a route restriction, for example Maximum Speed, you can set it to zero.
3
Setting a destination
- Tap the Search button.
- Enter an address, the name of a place, or the type of place (e.g. restaurant or camping).
- Tap on a result to select it.
- Tap a Drive button to plan a route.
4
Setting a scenic routing
- Select Scenic Routes in the main menu.
- Choose the desired level of windiness and hilliness at the right-hand top of the screen.
- Tap on the map to choose the destination. By clicking on Add the device will plan a roundtrip. When choosing a Set Destination, the device will plan a route from A to B.
5
Easy updating using Wi-Fi®
Use Wi-Fi® to get the latest features, map updates, and QuickGPSfix for your GO Exclusive/ GO Camper Max/ GO Camper Max 2nd Gen. No computer needed!
To get updates, open the main menu. Tap Settings, then tap Updates & New Items. Follow the prompts to set up an internet connection and download updates.
To learn more, click: Updating your device using Wi-Fi
6
Installing in your car
- Connect the USB cable to the mount and to your vehicle charger.
- Connect the charger to the power supply on your dashboard.
- Push the mount firmly against your windshield and turn the base clockwise until you feel it lock.
- Place your TomTom GO Exclusive/ GO Camper Max/ GO Camper Max 2nd Gen in the mount, making sure that it clicks into place. You can use a Dashboard Mount Disk(non included) to attach the mount to your dashboard.
- On some of our larger devices there is an extra locking mechanism at the rear of the mount which may also need adjusting.
7
Connecting your phone
- Connect your phone to your TomTom GO Exclusive/ GO Camper Max/ GO Camper Max 2nd Gen for traffic updates.
- To set up the connection to your phone, open the main menu, tap Settings, then tap the Bluetooth® icon.
To learn more, click: Connecting to TomTom Services
8
Camper POIs
To show POIs list on the map, go in the main menu to Settings, then Map & Display, then show on map, then Points of Interest. Camper specific POIs are under More categories.
The POIs list locations are shown on the map. Tap a POI to quickly plan a route. To search a Camper POIs, tap Search. Enter a POI or a POI list name. Search results appear in the list. Tap on a result to select it.