Congratulations on your new TomTom Rider! This article will take you through the steps to set up your new device and get you moving.
You will learn how to set up your Wi-Fi connection to check for software and map updates and get connected to TomTom services. You can also find your user manual at the bottom.
1
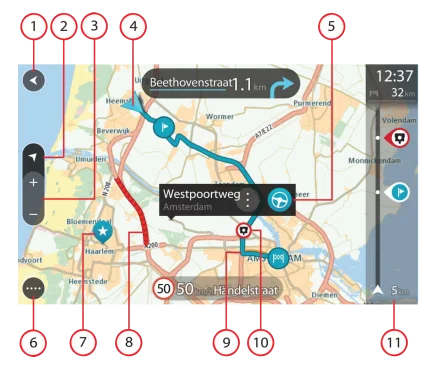
Getting to know your TomTom RIDER

- Back Button
- Switch view button.
- Zoom buttons.
- Current location.
- Selected locations.
- Main Menu button.
- Map symbols.
- Traffic Information.
- Your route.
- Speed cameras on your route.
- Route bar.
2
Mount your TomTom Rider
- Attach the RAM mount kit to your motorcycle.
- Fix the holder to the mount and connect the wires to your bike's wiring system.
- Place your Rider in the holder. You can rotate it ninety degrees to get your preferred view.
3
Easy updating using Wi-Fi®
- Use Wi-Fi® to get the latest features, map updates, and QuickGPSfix for your TomTom RIDER. No computer needed!
- To get updates, open the main menu . Tap Settings , then tap Updates & New Items . Follow the prompts to set up an internet connection and get the updates.
4
Connecting your phone and headset
- Connect your phone and headset to get accurate traffic information and other TomTom Services.
- On your Rider, go to the main menu and tap Settings then tap Bluetooth. Make sure your phone and headset are in connection mode.
- To connect your phone tap Add Phone . Learn more about connecting your phone.
To connect your headset` tap Add Device then Add Headset and follow the steps on your device.
Learn more about connecting your headset.
5
Plan a thrilling ride
- Plan a Thrill can be found in the main menu. Tap locations on the map to plan a round-trip.
- Use the buttons at the top of the screen to select the level of curves and hills.
6
Planning routes online
You can also share routes directly between two Rider devices. On your device, go to My Routes and tap Share Tracks to start sharing.