Onnittelut TomTom GO Professional -laitteen hankinnasta! Tässä artikkelissa käydään läpi uuden laitteen käyttöönoton vaiheet, jotta pääset liikkeelle.
Opit, miten Wi-Fi-yhteys määritetään ohjelmisto- ja karttapäivitysten tarkistamista varten ja miten saat yhteyden TomTom-palveluihin. Löydät myös käyttöoppaan näytön alareunasta.
1
Opi tuntemaan TomTom GO Professional -laitteesi
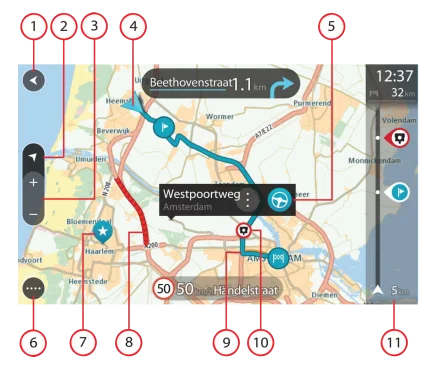
- Paluupainike.
- Näkymäpainike.
- Zoomauspainikkeet.
- Nykyinen sijainti.
- Valittu sijainti.
- Päävalikon painike.
- Karttasymbolit.
- Liikennetiedot.
- Reittisi.
- Nopeuskamerat ja vaaravyöhykkeet reitillä.
- Reittipalkki.
2
Määränpään asettaminen
Määränpään asettaminen
- Avaa päävalikko.
- Valitse Hae ja anna osoite tai haluamasi paikan nimi tai tyyppi, esimerkiksi ravintola. Osoitteet ja kaupungit näkyvät ruudun vasemmalla puolella ja kiinnostavat paikat ruudun oikealla puolella.
- Valitse hakutulos napauttamalla sitä.
- Suunnittele reitti napauttamalla Aja-painiketta.
3
Ajoneuvon tyypin määrittäminen
- Valitse päävalikosta Asetukset ja sitten Oma ajoneuvo.
- Valitse Ajoneuvon tyyppi ja valitse avautuvasta luettelosta ajoneuvosi tyyppi.
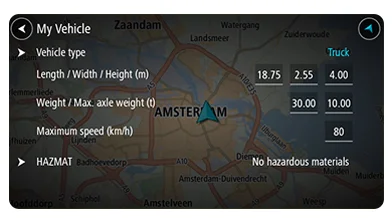
- Oma ajoneuvo -näytössä näkyvät valitun ajoneuvotyypin asetukset.
- Valitse jokainen asetus ja määritä ajoneuvon tyypin mukaiset arvot. Jos asetus ei ole reittirajoitus, kuten esimerkiksi Enimmäisnopeus, voit määrittää arvoksi nolla. Jos ajoneuvo on kuorma-auto, jolla kuljetetaan vaarallisia aineita, valitse Vaarallisten materiaalien rajoitus ja valitse kuljetettavien vaarallisten materiaalien tyyppi.
- Palaa karttanäkymään ja suunnittele reitti

4
Suosikkipaikkojen tallentaminen
- Valitse sijainti napauttamalla karttasymbolia tai painamalla karttaa pitkään.
- Napauta ponnahdusvalikkopainiketta.
- Valitse Lisää omiin paikkoihin ja anna paikalle nimi.
Kaikki tallentamasi sijainnit merkitään kartalle. Näin voit navigoida nopeasti kartan avulla. Näet suosikkipaikkasi Plan.TomTom.com -sovelluksessa puhelimellasi tai tietokoneellasi.
5
Puhelimen yhdistäminen
- Yhdistämällä puhelimesi saat käyttöösi tarkat liikennetiedot ja muut TomTom-palvelut*. Yhdistämällä puhelimesi voit ottaa käyttöön myös handsfree-puhelut ja älypuhelimen viestit.
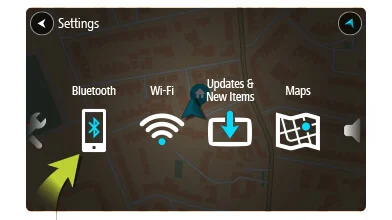
- Yhdistä navigaattori puhelimeesi avaamalla päävalikko. Valitse Asetukset ja sitten Bluetooth® . Valitse Lisää puhelin . Lisätietoja puhelimen yhdistämisestä.
*Käytettävissä vain Älypuhelin liitetty -navigaattoreilla. Muilla laitteilla nämä palvelut saa sisäisen SIM-kortin kautta.
6
Helppo päivitys Wi-Fi-yhteydellä®
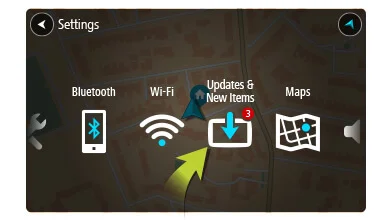
- Wi-Fi®-yhteydellä saat TomTom GO Professional -laitteeseesi uusimmat ominaisuudet, karttapäivitykset ja QuickGPSfix -tiedot. Tämä onnistuu ilman tietokonetta!
- Hae päivityksiä avaamalla päävalikko. Valitse Asetukset ja sitten Päivitykset ja uudet kohteet . Muodosta internet-yhteys ohjeiden avulla ja hae päivitykset.
Lisätietoja laitteen päivittämisestä.
7
Asentaminen autoon
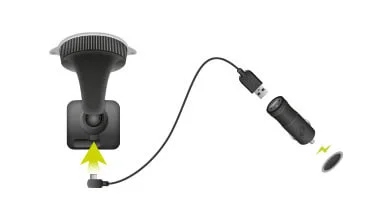
- Liitä mukana toimitettu USB-johto telineeseen ja USB-autolaturiin.
- Kytke laturi autosi kojelaudan virtaliitäntään.
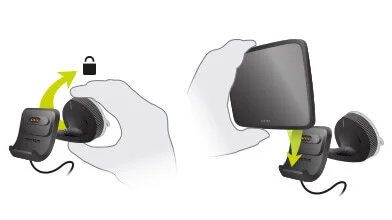
Paina telinettä kevyesti tuulilasia vasten ja kierrä sen pohjaa myötäpäivään, kunnes se lukittuu.
Aseta TomTom GO Professional telineeseen ja napsauta se paikalleen.
Voit kiinnittää laitteen kojelautaan myös erikseen myytävän kojelaudan kiinnityskiekon avulla.
Tutustu kiinnitystarvikevalikoimaamme .
8
Nopeammin perille
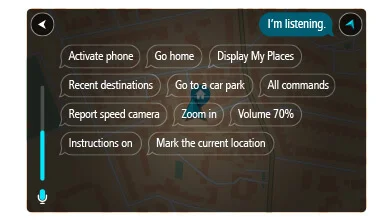
Hallitse TomTom GO Professional -laitetta omalla äänelläsi. Aktivoi ääniohjaus ja näe mahdolliset komennot sanomalla kartta- tai opastusnäkymässä "Hei TomTom".
TomTom MyDrive -sovelluksella voit suunnitella reittejä, tarkistaa liikennetiedot sekä lähettää kohteita ja suosikkeja TomTom GO Professional -laitteeseesi. Asenna MyDrive-sovellus puhelimeesi tai tablet-laitteeseesi tai avaa Plan.TomTom.com tietokoneellasi.